product type
Custom Transom Number Installation | Stock Transom Number Installation
Custom Transom Number Installation
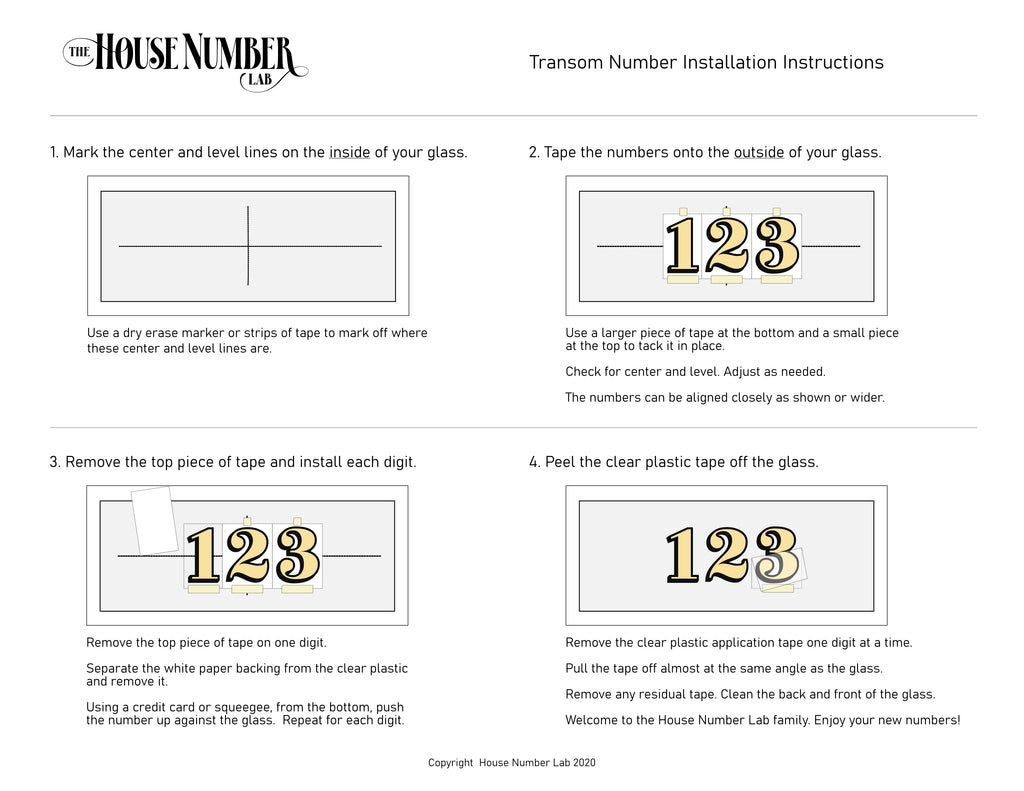
We developed this process to ensure you get professional results. Please review the diagram and written instructions prior to installing. Please contact us with any questions.
Transom Number Anatomy

A. Cleaning the window and positioning the number
Check the weather. It’s best if its between 40 and 90 degrees Fahrenheit.
Unpack and lay out your numbers to rest and flatten.
Gather these tools:
Position your step ladder so you are eye level with the glass – ensure good clean lighting so you can see what you are doing.
Clean your window – wash and rinse with water and a dab of dish-soap. Dry with lint free towel. Finish the cleaning with isopropyl alcohol and lint free cloth. Wipe in one direction. No lint.
Mark the vertical center and horizontal level with the dry erase marker (do on outside of window if doing interior installation).
Temporarily tape the number up on the inside of the glass, aligning the center and level marks. Check for position. Adjust as necessary.
B. Installing the number
Flatten the numbers with the squeegee. Push down to ensure good adherence.
Peel the backing paper away from the numbers.
Spray the application fluid against the glass. Mist it but cover all of the area that you’ll be installing.
Apply the numbers to align the vertical and horizontal marks on the number with the glass.
Squeegee the numbers to the glass and push the application fluid out from in front of the numbers.
After 5 minutes, squeegee some more.
Take a look from the front and work any additional water or bubbles out with your finger.
After 30 minutes, spray the rest of the application fluid to the back of the numbers. The paper should soften up and be easy to remove now.
Slowly peel back the application tape from the number. Try and pull the tape at close to a 180 degree angle to the actual numbers. This help reduce the likelihood of pulling the numbers off. If any gold begins to peel off , gently roll it back on the glass and wait another 5 minutes before attempting again.
Wait another 5 minutes and then clean around the number with a clean lint free towel and alcohol. Be sure no lint is sticking in against the numbers.
C. Installing the shade
Flatten the shade with your squeegee against a clean surface like a table.
Peel the shade away from the backing paper and reposition the paper (with the shiny side) against the numbers so that the registration marks are exposed. Be sure all of the actual shade is covered with the backing paper.
Line up the registration marks. Shade rectangle should be perfectly within the number rectangles. Once aligned, push the application tape against the window to get a good tight fit. This will now be your hinge for installing the rest of the shade.
Peel the application tape back and remove the paper.
Slowly squeegee the shade onto the glass rolling up slowly from the bottom where the registration marks are hinged. Once installed, work you finger around the outside edge of the number to squeeze any air pockets out. If there are some in there, fear not, they can be removed.
Slowly remove the application tape from the shade. Maintain a steep angle (~180 degrees) to minimize pull on the shade.
Remove the registration marks.
Celebrate a job well done!
Stock Transom Number Installation
